An email signup form is a web page (or part of a web page) that people can use to join your mailing list. Direct Mail makes it easy to create three different types of signup forms:
- Landing Page: This is a standalone web page with its own URL. You can customize the page and share the URL to collect new subscribers.
- Embedded Form: This is a form that you embed on your existing web page(s). It is designed to be blend in seamlessly with your existing design. Direct Mail provides you the HTML code that you will need to paste into your web page.
- Pop-Up Form: This is a form that appears on top of your existing web page(s). You can control when and how the pop-up form appears on your web page. Direct Mail provides you the HTML code that you will need to paste into your web page to make the pop-up form appear.
How Forms Work
Your form is always ready to collect new subscribers, even if your Mac is turned off or Direct Mail is not running. New subscribers are saved on our servers and automatically synced to your project.
A form is linked to a group in your mailing list. When you create a new form, a new group is automatically added to your mailing list and the form is linked to the group. This helps you keep track of which contacts in your list were added via the form.
Our email signup forms are protected against spam and bot sign-ups without the use of annoying captcha challenges. By default, our forms are single opt-in forms. This means that the person submitting the form is added to your list right away without having to click through a confirmation email. You can edit your form to be double opt-in, if desired. Please see below for details.
Create a Form
To create a form:
- Select the list you want the form to belong to
- Click + in the toolbar
- Choose New Signup Form
- Choose the kind of form you want to create
A new form and a new group are created and added to your mailing list, and the form editor window appears.
Duplicate an Existing Form
You can duplicate an existing form:
- Select the group that your existing form is attached to
- Choose Edit > Duplicate Form Only from the menu bar at the top of your screen
Your form is duplicated and attached to a new group in your mailing list. The form editor window will then appear.
Form Editor Window
Use the form editor window to customize your form. The form editor window is organized as follows:
- Status Bar: Located at the top of the window. The status bar shows the URL of your form (for landing pages) or instructions on how to install the form on your web page (for embedded and pop-up forms).
- Tab Bar: Located underneath the status bar. Use the tab bar to navigate between the different "pages" of your form:
- The page titled Form is what the user sees when filling out your form
- Submitted is what the user sees after they have submitted your form
- Confirmed is what the user sees after clicking through the confirmation email (only for double opt-in forms)
- Content Toolbar: Located underneath the tab bar. Use the buttons in the content toolbar to add fields, text, images, and more to your form.
- Inspector: Located on the right-hand side of the window. Use the inspector to edit the style and behavior of your form. As you select different elements of your form, the inspector updates to show you options relevant to the selection.
If you make changes to your form, a button titled Save and Publish will appear in the toolbar. Your changes are not published to the internet until that button is clicked. If you want to revert the changes you have made, you can choose Edit > Undo from the menu bar, or simply close the form editor window and click Discard Changes.
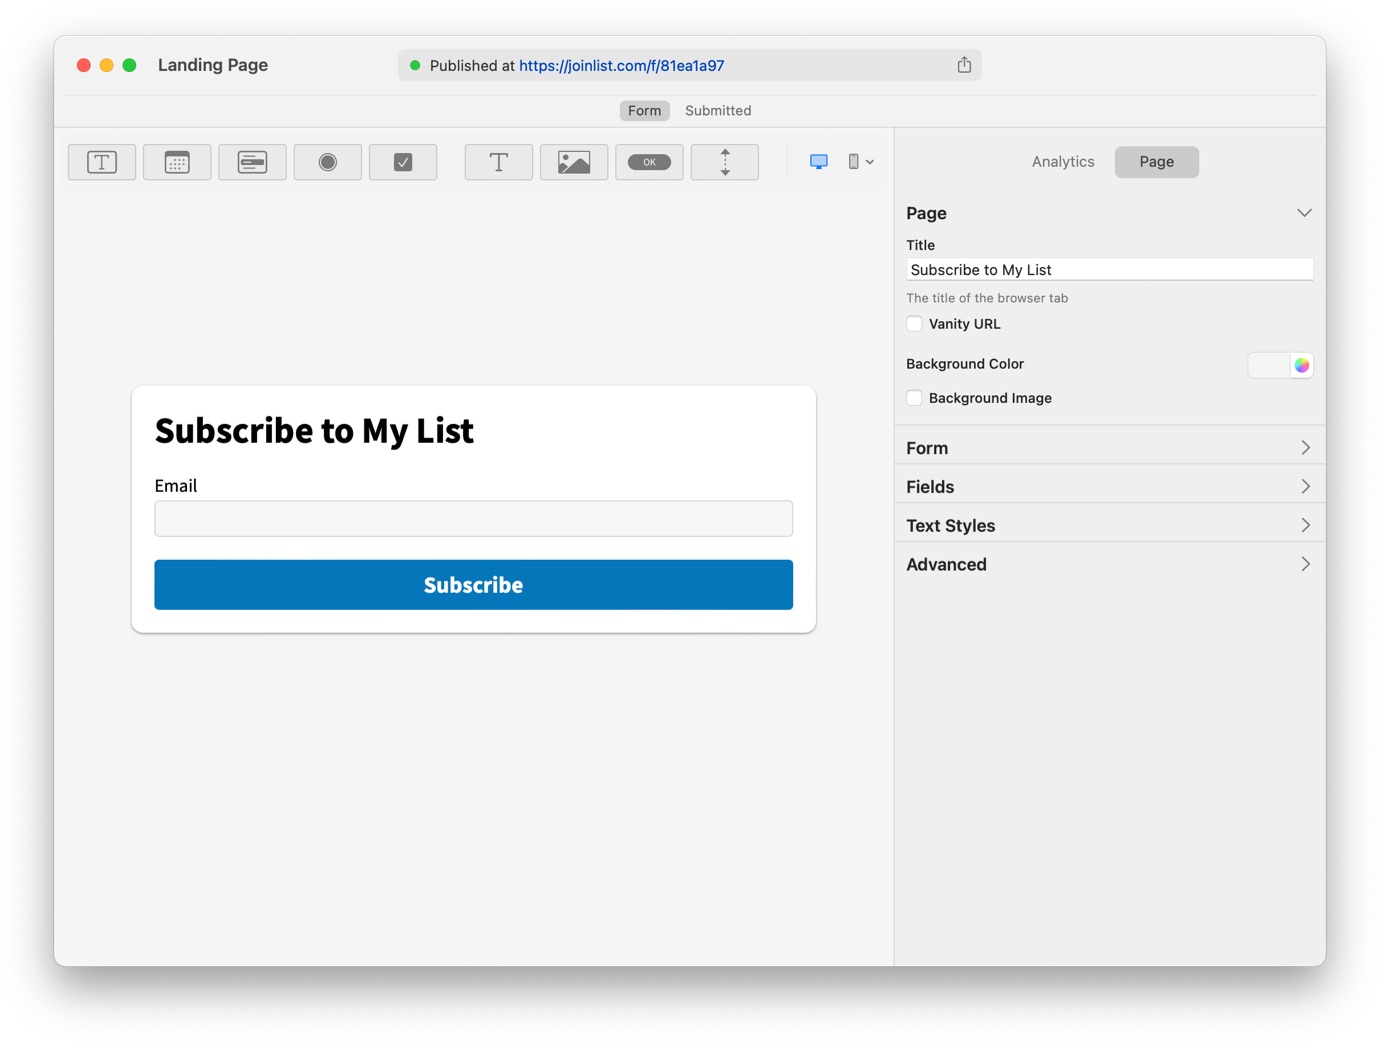
Customize and Publish a Landing Page Form
Your landing page form is published as soon as it is created. Use the Share button in the status bar to copy or share the URL to the form.
Use the content toolbar and the inspector to customize your form. Most of the settings are common across all kinds of forms, but the following are unique to landing pages:
- Page > Title: This is the title of the landing page as it will appear in the browser tab.
- Page > Vanity URL: By default, your landing page is created with a URL that begins with
joinlist.comfollowed by a unique identifier. Use the Vanity URL option to create a custom URL. For example:joinlist.com/runcluborjoinlist.com/hotrods. - Page > Background Color and Image: You can give your landing page a custom background color and image
- Advanced > Prevent Search Indexing: If enabled, the page is updated to indicate to search engines (like Google and Bing) that the page should not be included in their search index.
Customize and Publish an Embedded Form
Your embedded form can be customized as soon as it is created, but it does not start collecting new subscribers until you add it to your website. To add your form to your website:
- Click Install in the status bar
- Copy the HTML code that is displayed
- Paste the HTML code into your web page in the place you want the form to appear
Use the content toolbar and the inspector to customize your form.
Customize and Publish a Pop-up Form
Your pop-up form can be customized as soon as it is created, but it does not start collecting new subscribers until you add it to your website. To add your form to your website:
- Click Install in the status bar
- Copy the HTML code that is displayed
- Paste the HTML code into your web page. We recommend pasting inside the
<head>…</head>tags of your page.
The next time you load the page, the pop-up form will appear (based on the timing you configured).
Pop-up forms are designed to not annoy visitors to your website. If a visitor closes the pop-up, it is not shown again for 365 days. This can make it difficult to test your form or verify changes. The form editor includes two features to help make this process easier:
- Click Install in the status bar
- Click the Test Form tab
- Enter the URL of the page where the pop-up form is installed
- Click Test Installation to test if the HTML code has been installed correctly on the page
- Click Show in Browser to open your page in a web browser and force the pop-up form to appear
Use the content toolbar and the inspector to customize your form. Most of the settings are common across all kinds of forms, but the following are unique to pop-up forms:
Callout
On small screens, the sudden appearance of a pop-up form can be jarring. To prevent this bad user experience, you can use a callout. This is the default when a visitor views your page on a mobile device.
A callout is an unobtrusive banner at the bottom (or top) of the page that invites the visitor to subscribe. When they click or tap the banner, the full pop-up form appears.
You can enable the callout in the Presentation > Show Callout section of the inspector. You can edit the callout by clicking Callout in the tab bar.
Timing
You can control the timing of when your pop-up appears. Use the Presentation > Show Pop-up menu to choose from the following options:
- Immediately: The pop-up appears as soon as the page is loaded
- After Delay: The pop-up appears a number of seconds after the page is loaded. You can configure the delay.
- After Scrolling: The pop-up appears as soon as the visitor has scrolled a certain percentage down the page. You can configure the percentage.
- At Exit: The pop-up appears if the visitor is about to exit the page by going back in their browser
- Manually: The pop-up does not appear automatically. You will need to display it manually. This is done in one of two ways:
- Navigate to
#dm-open-popupon the page. For example, create an anchor element as follows:<a href="#dm-open-popup">Show Pop-up</a> - Use JavaScript to open the pop-up by calling
DirectMail.openPopUp()
- Navigate to
Background
You can control the backdrop that appears under the pop-up form and over the content of your web page. Expand the Background section to show the settings for color, opacity, and blur.
Layout
Your pop-up form can optionally display a "hero" image along the top, left, or right sides. Expand the Layout section to control the layout of the hero image and close button.
If you use a hero image, click on the hero image placeholder to choose the image.
Click on the close button to edit the appearance of the button.
Edit Your Form Later
You can edit your form at any time:
- Navigate to the Contacts tab
- Expand your list by clicking the disclosure triangle next to the list name
- Select the group that is linked to your form
- In the inspector, expand the section titled Signup Form
- Click Edit Form. The form editor window appears.
- Make your changes and click Save and Publish in the toolbar
Your form is updated automatically. You do not need to update any code on your website (for embedded and pop-up forms).
Add Fields to Your Form
Use the content toolbar to add the following types of fields and blocks to your form:
Text Field

Use the inspector to set the following properties:
- Label: Recommended. Click BIU to add formatting.
- Help Text: Optional. Appears below the label. Click BIU to add formatting.
- Size: Single Line or Multiple Line
- Placeholder: Optional. Gives a hint to the visitor as to what should appear in the field, but is not included when the form is submitted.
- Default Value: The initial value of the field. Will be included when the form is submitted unless the visitor changes it.
- Import As: How you want this field imported when the contact is created in Direct Mail
- Required: If checked, the form cannot be submitted if the field is blank
Date Field

Use the inspector to set the following properties:
- Label: Recommended. Click BIU to add formatting.
- Help Text: Optional. Appears below the label. Click BIU to add formatting.
- Minimum Value: Optional. Used to enforce the earliest date allowed.
- Maximum Value: Optional. Used to enforce the latest date allowed.
- Default Value: Optional
- Import As: How you want this field imported when the contact is created in Direct Mail
- Required: If checked, the form cannot be submitted if the date is not set
Multiple Choice Fields (Pop-up Menu, Radio Button, Checkbox)

Use a pop-up menu when only one choice can be selected and the list of possible choices is long. Use a radio button when only one choice can be selected, but the list of possible choices is short. Use a checkbox when multiple choices can be selected or as a toggle for a single choice.
Use the inspector to set the following properties:
- Label: Recommended. Click BIU to add formatting.
- Help Text: Optional. Appears below the label. Click BIU to add formatting.
- Style: The type of multiple choice control to use
- Choices: Enter the choices the visitor can select from.
- The Name column is the text that appears to the visitor
- The Value column is the text that is imported to Direct Mail
- The Checkbox column indicates which of the choices should be selected as the default
- Click + to add a choice. Click-and-hold + to import a list of choices from a file or generate a series of numerical choices.
- Select a choice, and click BIU to format the name of the choice (only applies to checkbox and radio button)
- Randomize: You can have the choices appear in a random order each time the form is displayed
- Import As: How you want this field imported when the contact is created in Direct Mail
- Required: If checked, the form cannot be submitted unless a choice has been made. For checkboxes, you can set the minimum number of choices that must be selected.
Text Block

Use the inspector to set the context of the text block. Click BIU to add formatting or links.
Image Block

Use the inspector to set the image, text description, size, and other properties of the image.
Button

Use the inspector to set the title, color, link, and other properties of the button.
Spacer

Use the inspector to set the height of the spacer and to optionally add a line/divider.
Suggestions

Use the Suggestions button to quickly add pre-populated fields to your form, including:
- Permission checkbox
- Permission checkbox with GDPR-specific language
- Email Frequency (how often do you want to hear from us?)
- Countries, states, provinces, and regions
- Months, days of the month, days of the week, hours of the day
- Salutation
- Gender
Convert to Double Opt-In
Signup forms are single opt-in by default. This means the subscriber is added to your list immediately without having to click through a confirmation email. You can convert your form to double opt-in. This means the subscriber is not added to your list until they click through a confirmation email.
- In the tab bar, click the Submitted page
- In the inspector, expand the section titled Opt-in Policy
- Click Double Opt-in
- Enter the name of your mailing list as you want it to appear in the confirmation email.
- Click Save and Publish in the toolbar
You are not allowed to edit the content of the confirmation email. The confirmation email is sent using the language you have chosen for your form (see Form > Advanced > Language)
Enable New Subscriber Notifications
You can be notified by email each time a new subscriber joins your list. To enable notifications:
- In the tab bar, click the Submitted page
- In the inspector, expand the section titled Notifications
- Choose an option from the New Subscriber pop-up menu (Off, Individual, or Daily)
- Enter one or more email addresses
- Click Save and Publish in the toolbar
Send a Welcome Email to New Subscribers
Use our autoresponder feature to automatically send welcome emails to new subscribers when they join:
- In the tab bar, click the Submitted page
- In the inspector, expand the section titled Welcome Email
- Click New Autoresponder
A new autoresponder is created for you, but is not started until you are ready. Click Go to Autoresponder to configure autoresponder settings.
Edit Advanced Settings
Advanced settings are found by clicking Page in the tab bar, then expanding the Advanced section in the inspector.
- Language: This is the language that is used for error messages and (if enabled) confirmation emails
- Hidden Fields: These are form fields that are hidden from the user, but are still synced to Direct Mail when the form is submitted
- Custom CSS: You can use custom CSS to style your form